Look at the adorable dogs and cats in this Halloween table runner! Today, we'll show you how we made our newest table runner with a combination of rotary strip cutting and fussy cutting. Fussy cutting makes any sewing project look very professional, designer-inspired, and custom-made. We'll explain below.
Halloween Friends, 16 ½" x 44 ½" by Quilt Inspiration
Many thanks to our good friend at the Guild Of Quilters of Contra Costa County for the quilting!
Of course, you can also sew a table runner for any holiday or season of the year, using any fabric motif that you wish. To get you started, we will list tools needed, plus the fabric amounts and cutting directions.
Tools needed:
Rotary cutter, cutting mat, 24" ruler, and 4" square ruler or 4" square plastic template for fussy cutting.
Fabric Requirements:
We made our runner 11 squares across and 3 squares down, for a total of 33 squares, each one cut 4", which will be a finished size of 3 ½" square.
Cutting the squares: We chose high-contrast fabrics, as we wanted lots of bright colors.
Fabric A: Choose a dark background fabric with a large print for fussy cutting. (Our fabric has a purple background). You'll need about 1 yard or a little more of fabric, depending on how large the print motif is. Fussy cut 9 pieces, each one 4" square.
Fabric B: Choose a large print fabric with a light background for fussy cutting. (Our fabric has an off-white background). You'll need about 1 yard of fabric, or a little more, depending on how large the print motif is. Fussy cut 8 pieces, each one 4" square.
Fabric C: ( We chose the black cats with the pumpkins) Choose 1/4 yard of a medium or small print This fabric will be rotary cut into 4" strips, then 4" squares. Cut 8 squares.
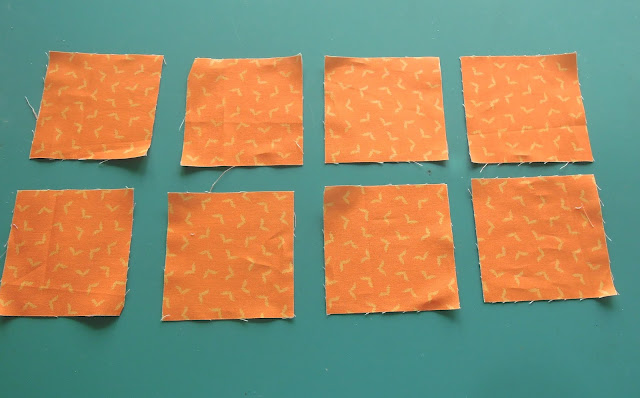
Fabric D: ( We chose the orange fabric with the lighter orange flying bats). This fabric will also be rotary cut into 4" strips, then 4" squares. Use 1/4 yard of a solid or tone-on-tone print of a background fabric. Cut 8 squares.
Cutting the border, backing, and binding:
Fabric E: Border fabric. Cut 3 strips 3 ½" wide on the cross grain of your fabric, from selvedge to selvedge. They should be 36" long or more, depending on your fabric. Then cut one of those strips in half, to form the two short sides of the borders.
Fabric F: Binding and backing fabric.
Binding requires 1/3 yard of fabric. Cut 4 binding strips 2 ½" on the cross grain of your fabric, from selvedge to selvedge.
The backing requires a piece of fabric that is at least 50" long by 22" wide. You can use fabric remnants to piece your backing together, or you can cut one solid piece of backing fabric, as we did.
Cutting and Sewing Instructions:
Fabrics A & B are large print fabrics, so we will fussy cut those with the 4" square ruler or plastic template.
In fussy cutting, select a certain area of the fabric where we want to cut out just that specific printed motif. Cut in a square around that motif or design, rather than just cutting the fabric into random strips.
Make sure that the square template is positioned directly over the center of the motif you want to cut. Remember that you will be sewing a 1/4" seam, which will take up the outer edges of the fabric square, so the design on those edges will not show in your finished table runner.
In our case, Fabric A is the purple background fabric with the large print puppy dogs. We need to cut 9 squares, so we are going to place the square template directly over the specific motifs that we wish to display. Then we will cut around that square.
In the photo above, you can see the fabric after fussy cutting. Because we targeted the specific large print motifs, the fussy cutting results in a more custom-made look for the fabric square, much like a framed photograph, with the subject in the foreground.
After fussy cutting, your large print fabric will have empty spaces where you targeted a specific motif .
Your big piece of fabric will look like the photo above. There will be holes in the fabric where you cut around the square temple in order to extract one or more of the large print motifs.
Now you'll do the same with Fabric B. Select the large-print motifs you like, then fussy cut 8 squares of Fabric B, using the 4" square ruler or plastic template.
Fabric B is our large print fabric with the off-white background. Above, here are the 8 fussy cut large print motifs for this fabric.
Fabric C is a medium to small print fabric, which can be rotary cut in a strip. Rotary cut one long 4" width of fabric of Fabric C, then slice that into 8 individual squares of 4" apiece.
Above, is our medium-print Fabric C of kitty cats after we rotary cut it into 8 pieces of 4 inch squares.
Fabric D is a solid color or tone-on-tone background fabric, meant to give contrast to the other prints. Rotary cut 1 long 4" wide width of fabric strip of Fabric D, then slice that into 8 individual squares of 4" apiece.
Above, you can see our Fabric D, which was rotary cut into 8 squares of 4" each.
Now it's time to do the fun part ! Lay out your 4" squares in whatever arrangement you like, as long as you have 3 long rows of 11 squares each.
In the photo above, you can see that we arranged our squares in diagonal rows, running downward from the top right.
Please note: You can also arrange your squares vertically in order to create a banner to hang on the wall:
Above, this is how a vertical layout might look. You still have 33 squares, arranged in 3 long rows of 11 squares each.
Use your favorite chain-piecing method to sew your squares together, using 1/4" seams.
The finished size of your 4" squares will be 3 ½".Next, it's time to add the borders, which are cut into two long strips of 3 ½" by the width of the fabric, and two short strips, which are cut 3 ½" x approximately 21" (half the width of most fabric, as you previously cut those strips in half).
Very Important: For BOTH horizontal and vertical layouts, add the border strips to the long side first, then add the strips to the short sides. That way, you will have enough fabric for the long sides.Cut 4 binding strips that are 2 ½" wide x the fabric width. Cut one solid piece of backing fabric that is at least 50" long x 22" wide. Or, you can make a pieced backing out of fabric remnants
This cheerful polka dot fabric makes the perfect backing and matching binding.
Finish sewing the binding, and enjoy your new runner ! We wish you a very happy and safe Halloween!


