Here is a Parade of Stars table runner, which is perfect for the patriotic holidays coming up. We love the combination of stars, fireworks, and flags. At 16 x 46", it's perfect for a wall hanging or table runner. We've written up a FREE tutorial for your use.
For continuous listings of free quilt patterns, please check us out on Twitter !
For bargains on jewelry, patterns, and collectibles, check us out on E-Bay - we're Top Rated Sellers !
Parade of Stars Table Runner 16” x 46”
INSTRUCTIONS: The quilt center consists of squares in a 4 x 16 grid, using 64 squares.
FABRIC:
1/4 yd EACH of red, white, and blue fabrics for patchwork squares.
1/4 yd medium to large size print fabric for borders
1 piece of fabric size 21" x 54" cut lengthwise for backing
5 strips of binding fabric size 2.5 " x 40 " cut on the crosswise grain of fabric.
CUTTING: [instructions for quilt center, borders, and backing]
Cut 22 red squares size 2.5" x 2.5"
Cut 21 white squares size 2.5" x 2.5 "
Cut 21 blue squares size 2.5" x 2.5"
Cut top and bottom borders size 3.5" x 43" ( You will be trimming off excess at the ends)
Cut side borders size 3.5" x 20" ( You will be trimming off excess at the ends)
Cut the backing lengthwise, in one long piece, size 21" x 54". That way, you will have some excess backing fabric on the sides, in case you wish to long-arm quilt this project.
LAYOUT: Arrange the 64 squares in a grid, as shown in the diagram below.
Note that on the layout diagram, the columns are labelled 1 through 16 and the rows are labelled A, B, C, and D.
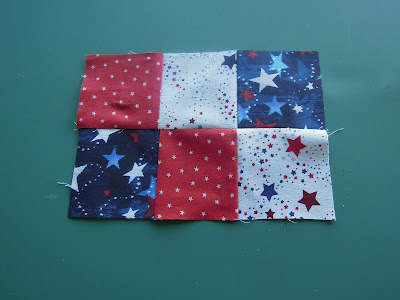
Step 1. Assemble the patches by sewing the squares together in sets. Start at the left-hand side of the diagram. For example, sew A1, A2 and; A3; then sew B1, B2, and B3. Our photos below show how we started sewing our sets.
Assemble a six-patch block by sewing these A and B strips together. Our photo below shows how we sewed Row A 1-3 to Row B 1-3
Continue in this fashion for the remaining blocks. (Column 16 can be assembled in sets of two patches).
Step 2. Join the sets to make the quilt center.
Step 3. Add the borders. There are two short and two longer strips for the border. Sew the longer strips to the top and bottom of the quilt center. Then sew the short border strips to the sides of the quilt.
Step 4. Finish the quilt: Add the backing and your choice of batting. Bind the quilt.
It's easy to stitch up this project in a day! We used an archived fabric collection; photos of the fabrics are shown below for reference. Have fun picking your own red, white and blue fabrics!
We hope you enjoy this tutorial! Image credits: Photos and design are by Quilt Inspiration.


No comments:
Post a Comment
We love reading each and every comment... thanks for visiting our blog!