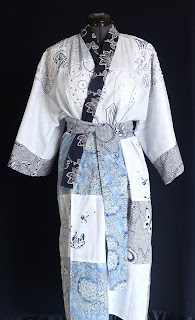
Recently we made an 18" pillow using quarter-square triangles from a man’s shirt, and we liked the way the mitered boxes looked... here’s the tutorial.


Step 1. Select a man’s dress shirt, 100% cotton, size XL or larger for an 18” pillow (directions for a 16" pillow are given below). The nearly-new Italian shirt shown below was made of fine Egyptian cotton and it cost $3 at the thrift shop.

Wash before cutting. Keep the button placket intact on the front of the shirt; do not cut it off. Cut off the cuffs and collar. Cut away the sleeves and set them aside for the project. Then cut along the side seam allowances to separate the front and back of the shirt. Cut off the shoulder pieces.
Step 2. Preview the layout

Photo A upper left: We will cut a 19” square out of the front of the shirt, centering the square on the button placket. This will become the back of the pillow.
Photo B upper right: We will cut two 20” (w) x 10” (h) triangles out of the back of the shirt.
Photos C and D lower left and right: We will cut a 20” x 10” triangle out of each sleeve.
Step 3. Make a paper pattern for the quarter-square triangles

Mark out a 20” square on a large piece of plain newsprint or craft paper. This includes a ½” seam allowance.
Draw an “X” from corner to corner, then cut into four triangles as shown above.
Step 4. Lay out the triangles on the shirt back and sleeves.

Decide where to place the quarter-square triangles relative to the stripe pattern, making sure to use the same alignment for all 4 triangles.
This shirt has stripes that are asymmetrical, which means that all triangles must be oriented the same way. As shown above, we lined up the base of each triangle with the black stripe. We chose this orientation so that the center of the pillow, and the edges of the pillow, would not fall right on top of a stripe. (See the first photo of the finished pillow… the center of the pillow looks like an open box).
Your decision as to where to place the triangles will depend on the stripes you have to work with.
Use scotch tape to attach the pattern to the shirt. It is sticky enough but easily removed. Cut out the triangles from the shirt back and sleeves using a ruler and a rotary cutter, then remove the pattern pieces and tape, being careful not to stretch the bias edges of the triangles.
Step 5. Sew the quarter-square triangles together.

Sew two pairs of triangles together along the bias edges, right sides together, matching the stripes, using a ½” seam allowance.
Make sure the stripes match as you are pinning, by sticking a pin through the top piece – the pin should come out at the same place on the bottom piece.
Press the seams open. Now you have two half-square triangles as shown below.
Step 6. Sew the half-square triangles together.

Now sew the two half-square triangles together, right sides together, matching the center seam and the stripes. This will be the pillow front.
Step 7. Prepare the back of the pillow.

Prepare the back of the pillow using the shirt front; the button placket will become the button closure on the pillow. You will need a square that is 19" x 19".
Decide whether or not to keep the shirt pocket. We like it because it reminds us that the pillow came from a shirt! If you prefer, you can remove the pocket with a seam ripper, or you can mark and cut right through the pocket. Consult the next diagram before marking and cutting.
Use a water-soluble pen to mark out the square as shown above: Center the 9.5” mark on the ruler over the buttonholes. Mark the shirt at 0” and 19” on the ruler; note the 19” mark just meets the armhole on this shirt and it is about 1-1/4” above the pocket. If the shirt is smaller you will have to move the ruler further down. To make sure all of the cuts will be square, use the stripes on the shirt as a guide to line up the marks on the ruler.
Cut the 19” square with fabric scissors instead of a rotary cutter, since you will be cutting through the thick button placket. It will cut easily with a good pair of scissors.

This is the 19” square that was cut from the front of the shirt. Notice the placement of the 5 buttons on the placket – the buttons are not too close to the top and bottom edges, since you do not want to have to sew over a button !
After you have cut this piece, unbutton the middle 3 buttons so there will be room to insert the pillow form once the front and back of the pillow cover are assembled.
Step 8. Sew the front and back of the pillow together.

Pin the front of the cover to the back, right sides together. There are no stripes to match. Sew a ½” seam all the way around.
You can sew using one stripe as a guide, so that the stripe pattern will match on the left and right sides of the pillow.
After sewing, turn the pillow cover right side out through the button placket on the back side and insert an 18” pillow form. et voila… one nifty pillow. You can even hide a remote control in the shirt pocket on the back !

More sizes and tips:
For a 16” pillow, cut a 17” square from the front of the shirt and an 18” square template for the quarter-square triangles.
Symmetrical stripe patterns are easier to work with. The triangles can be laid out facing each other on the back of the shirt.
You can make the mitered squares any size you want, and mix and match them in a quilt.
If two different colors are used for the triangles, they can be arranged to make hourglass blocks.
We'd love to hear your questions or comments !


Thanks for posting this! It's amazing what you can do with thrift shop finds!
ReplyDeleteLaDonna
Nicely done! I've never thought to do the diagonal stripey thing. Cool.
ReplyDeleteI recently used a Hawaiaan silk shirt to make a pillow covering, using the buttondown for the back. The fabric is a blue brocade-like design. And I love it! So comfy to my head while taking that sofa nap!
What a wonderful and nice idea!
ReplyDeleteGreetings from Germany
Elvira
How fun is that! I love it. I have make quilt blocks this way, much smaller, but I love the idea of a big pillow! I just happen to have some big shirts from the thrift shop too!!! huuuuummmmmm . . . could be my next project!
ReplyDeleteGreat idea. I think your cushion is really eye-catching. I like using recycled clothing. I made a meditation mat and covered my meditation stool with linen from a couple of old dresses and then I did large stitch quilting using some Sulky Blendables. If you'd like see photos you can find them here and here.
ReplyDeleteThanks for the great tutorial! I wanted to make a block like this recently but hadn't had a chance to sit down and figure out how to do it. Now you've done it all for me. Yay!
ReplyDeletehttp://pilgrimsquilts.blogspot.com/2010/07/memory-quilt-finished.html
ReplyDeleteThis is a memory quilt I made a friend from her mother and her childhood clothing. The only added fabric was the first burgundy boarder outside the central panel.
I don't like sewing zips in so this would be good for me. I quite liked the pattern that appeared in the Step 8 photo, showing all the chevrons nicely lined up.
ReplyDeleteI love visiting your page and seeing all the great quilts!!
ReplyDeleteI made a baby quilt with assorted items that belonged to the father a mother. They loved the house. http://2.bp.blogspot.com/_CY5pUHMOjfE/TMLrABLAYpI/AAAAAAAACOs/0JKc1jcAs_Q/s1600/Rachel's+baby+quilt+2010.JPGa!
Keep on blogging!!
I just found a great vintage dress shirt that I bought to make a throw pillow! And I just make this little picture frame out of my husbands old t shirt! http://mckinleyrose.blogspot.com/2011/04/shabby-chic-upcycled-photo-frame.html I love the way yours turned out! Very cool!
ReplyDeleteVery creative and how neatly and accuracy you combine all the lines that's the true beauty...
ReplyDeleteHope you would like to pay a visit to me at
http://craftaworld.blogspot.com/
Love
Farah